Thursday 1 January 2015

Zoo animals BOM

Minutes before midnight last night the lovely quiet play introduced us to a lovely new BOM. There's going to be 9 blocks in this all animals from the zoo. 

I've decided 2015 will be my year of trying new things. So thought I'd give paper piecing a go!


I won't lie I jumped straight in with the flamingoes eye and was ready to chuck him out the window by the end of that!!! I'm really glad that I persevered and am pretty happy with my efforts. 


Check out quiet plays block for more information and the free pattern to have a go yourself (you only have until the end of January to get your flamingo free)


Wednesday 31 December 2014

The Trapies Quilt - How to

So there has been a lot of interest on the Internet in the last few days on how to make my Trapies quilt block. So to celebrate the end of 2014 here's how...


 You will need

Paper templates ( the hexagon and trapezium, however you could purchase (or cut out) a large bunch of hexagons and cut them in half for the trapezium) my hexagons and trapeziums are 1 1/2inches however they would work with anything
Tacking thread
Sewing thread (I like to tack with something cheap that I will throw away later however when quilting I always use 100% cotton
Needle, scissors 
Fabric - for my actual quilt I am using a jelly roll (Mixed Bag by moda) and a fat quarter of white fabric (sorry don't know the name as I had it lounging in the sewing room)
Something to hold the fabric while you tack - I personally use clover clips however when I teach this at school we use paper clips - they work just as well; in the photographs below just picture a paper clip in place of the clover clip. You will use it in the same place

How to prepare the hexagons and trapeziums 

This is the same for both the hexagon and trapezium however for the trapezium I used a template that looked like this:


You will notice it is the same shape as the trapezium with a rough seam allowance - I actually made the height the same as the jelly roll so that I reduced the amount of waste and gave them a uniformed look.

Lay the paper template in the middle of the fabric on the wrong side 


Pin the fabric down to make it secure (on the trapeziums I do this on two opposite sides, on the hexagons I did this on 3 sides) 


Make a tacking stitch through the corners of the shape, ensuring that you carefully fold the fabric down around the paper to create a very crisp edge. 


Once complete it should look like this.


Remove the clips and ensure that the shape on the front is as the paper template was.


To create the Trapies block 

You will need:

6 trapeziums in 2 seperate colours ( a jelly roll strip yields 14 trapeziums allowing you to achieve 2 full blocks with 2 contrasting coloured trapeziums) 
1 hexagon
(As well as your sewing thread and scissors)


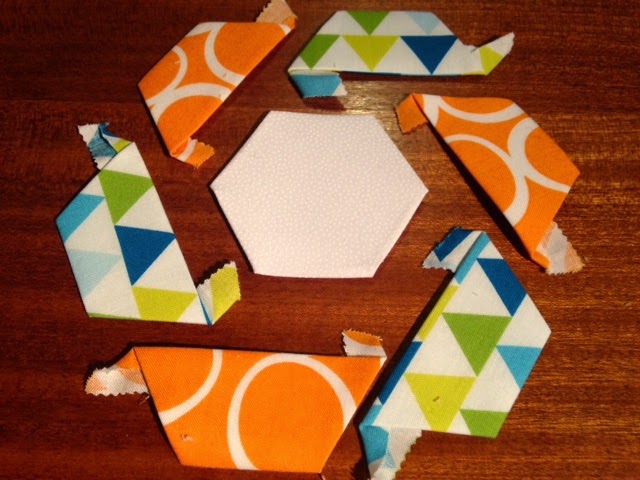
Lay 3 of each of the trapeziums around the hexagon so that they over lap the edge of the hexagon and the short edge of the next trapezium. (As below)


You're going to want to work on these in a circular motion - because of the way I have laid these out I need to sew anti clockwise. 

You will want to work on the pieces one at a time, so take your pick which one.


Pop your right sides together ensuring the left hand side of both pieces perfectly line up (this will make the end of this ring easier)


Slip or whip stitch along this edge.


Should open out to look like this


Take your second trapezium (remember I'm working anti clockwise) you want to take the trapezium that will mean you're seeing along straight edges.

Pop right sides together again and ensure that the trapezium edge is the same length as the length along the hexagon and trapezium that are already attached. 


Once stitched it should look like this


Continue working your way around the circumference of the hexagon like so:


This last one is the most complicated part of the entire block - but honestly this isn't that difficult either.

We're going to start sewing along the same edge that we have used for all the rest of the blocks , however in the photograph below I flipped the pieces over so that the trapezium I'm attaching is ontop of the hexagon undeneath.


Sew as before from the left edge up to the point where the other trapezium is attached to the hexagon.

At this point add a couple of securing stitches 


Open the pieces back out so you can see where the next piece needs to join.


If you fold carefully you will see that the paper naturally folds to create another straight line to sew around, and finish sewing to the edge.


You should now have a shape that looks something like this 


Now on to the outer ring. Lay the rest of your trapezium pieces out so that they alternate around the hexagon. You want the new trapezium to have the same colour as the short edge of the same coloured trapezium from the ring before (yeah I'm aware this probably doesn't make any sense so see the photo below)


The great thing about sewing them on to the previous ring is you can use the same thread all the way round without finishing off, as where one ends the next one starts.

Leaving you with a stunning block that looks like this 

front
 

And back 


If you have a go I would love to see so please coment below. There's a hashtag on Instagram already running #trapiesquilt so please tag. 

Sunday 28 December 2014

The Trapies Quilt

I know I've been away for what seems like forever, 2015 will hopefully be an opportunity for me to get my blog going again.

Back at the beginning of November I visited Duxford Quilt show. This was really inspirational and just what I needed to get the creative juices flowing again. From here I purchased a few English paper piecing templates from lina patchwork and got excited that evening by the possibilities of the shapes I could create (you might remember a few years ago i created a grandmothers garden quilt)


The main blocks that I was particularly interested in was the trapeziums, I also purchased a jelly roll at the quilt show and thought this would be a perfect use of the materials.


Since then I have been working on these quilt blocks that have been named the Trapies Quilt,

 I've posted lots of progress photos throughout Instagram and Facebook and today something absolutely amazing happened, I got really excited that two people (one from facebook and one from Instagram) decided to follow my pattern.

Today I achieved the exciting status of 1/4 of my blocks completed for the paper pieces cut out and basted. 

What I will do tomorrow is show you how to achieve this same look. 

I will leave you with a few photos of my blocks so far...


Friday 11 April 2014

Back to The Sewing Machine

For a while now you might remember I have been trying hard to loose a substantial amount of weight, because of this my sewing journey stopped until I had reached a comfortable point where I wasn't
 dropping a dress size every month.  I'm really pleased to announce I'm nearly at my destination on this crazy journey and I feel I can happily start making clothes again.

I know for certain this blog will be having a lot more posts about my sewing, so please bare with me while my blog attempts to find its perfect identity and works out what is going on, there will be a big variety of posts between now and who knows...

The first dress on my new wardrobe list was the cappuccino dress by Liesl Gibson for Oliver and S. 

I'd been looking for along time for the portfolio dress created by sew lisette for Simplicity (2245) but being out of print couldn't find it anywhere within a normal budget. When I saw Liesl Gibson had released a really similar but much improved pattern I jumped straight on the band wagon. 


It is the long anticipated pattern to replace the out of print portfolio dress (simplicity 2245) that I wish I had brought several years ago. I know so many people in the blogging world wanted to mark this portfolio and I'm sure as many will be making the new cappuccino. 

I used some basic cotton that I had in my stash to whip up this first number. 

Although really basic in colour, the style made me more than happy! With in 12 hours I was already onto making my second. I found the first one had some real pattern issues for me, I needed to create a full bust adjustment on it to make it fit a little better.

I used the same fabric again for the second pattern but to make it easier to tell this apart I also used a fabric of the same construction but red in colour.

Seriously, I'm not sure the dress can get any cuter than this. 

This time round I attempted to make the longer sleeves, I'm confident to say that this pattern will become a wardrobe staple for me and I'm already planning a few more versions of this to ensure I have enough wear out of the pattern. I love the tunic version that is also available and plan on making some changes of my own to play around with different constructions etc.

I love how easy it was to construct this dress and how it seems to be able to be dressed up and dressed down.

The red version was a little tight on the red fabric, and I love the cuteness of lining the pockets in something different, however I've so far worn this dress twice and both times someone has asked me what's white inside my pocket...

Of course I gave them the standard answer of CHICKENS!!! What else would a girl have in her pocket?


I've said it previously but I will say it again, this dress is amazing. If you've previously been on the fence about this one I need to tell you that you should get off the wall knowing your bare feet will be more than comfortable in the grass that is this amazing dress.

I will be looking out for Liesl Gibsons other patterns in a few weeks as well. Amazing!!!

Friday 28 February 2014

Project life organisation

This evening I've finally finished organising my prohect life 3x4 cards. 

I've got this divider from muji which fits them perfectly and allows me to see all the cards. 


There was a recent post in a Facebook group I'm in (Project Lifers) that suggested turning 1/2 the cards over so it's easier to see the other side. 

I've done this and organised it into categories. Other than my old kit (Amber) I have 5 categories in every collection. 

The only cards I haven't put into this organiser are the seasons mini kit and the holidays mini kit. I intend to keep those together so I can see them easier. 

Il leave you with some more photos. 


The dividers were made from some old scrapbook paper that I'm either not a massive fan of or have a lot of the same. And the Martha Stewart sticky tabs. 
Written on each is the kit name and a word about what's behind them. 


Monday 24 February 2014

Engagement gift - Project Life

I'm sure like all you guys you love talking about and sharing project life. 

One of my closest friends has just got engaged. I knew straight away I'd love to get her the wedding mini kit from Becky Higgins. 

This wasn't the most exciting gift I could think of, so I started thinking outside the box. 

I'm really lucky to have some amazing colleagues at work and some awesome equipment to use a laser cutter and supporting equipment to design and make these special cards.


She's planning on getting married on the Disney Dream ship so thought the bottom card was absolutely perfect. 

What do you think?? I'm sooo happy and I hope she is to.  Congratulations Gemma. Xx